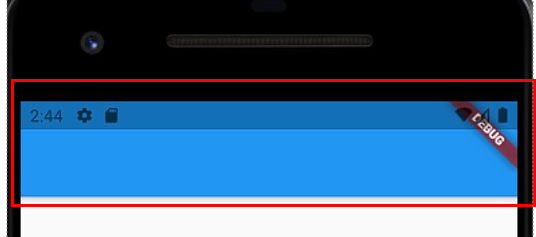
AppBar는 이미지에서도 볼 수 있듯이, 앱 상단에 위치하는 부분을 AppBar라고 한다.

AppBar는 주로 메뉴버튼을 만들거나, 제목을 다는 등 다양한 용도로 사용할 수 있다.
우선 다음과 같이 AppBar에 관한 기본 코드를 작성한다. 그러면 위에 이미지처럼 상단에 AppBar가 생기게 된다.
|
1
2
3
4
5
6
7
8
9
10
11
12
13
14
15
16
17
18
19
20
21
|
import 'package:flutter/material.dart'; //flutter의 package를 가져오는 코드 반드시 필요
void main() => runApp(MyApp()); //main에서 MyApp이란 클래스를 호출한다.
class MyApp extends StatelessWidget { //MyApp 클래스 선언
Widget build(BuildContext context) {
return MaterialApp(
title: 'my first app',
home: MyPage(),
);
}
}
class MyPage extends StatelessWidget {
Widget build(BuildContext context) {
return Scaffold(
appBar:AppBar(
),
);
}
}
|
cs |
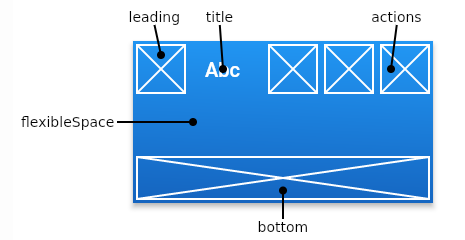
그 뒤에는 안쪽에 여러가지를 넣을 수 있는데 플러터 공식 사이트에서 가져온 이미지에 따르면

크게 5가지의 종류로 나뉜다.
모양을 보면 알 수 있듯이, leading과 actions는 icon을, title은 text를
flexibleSpace는 appBar의 크기를 조절할때, bottom은 appBar의 탭바(아래쪽에 화면을 이용)등에 쓰인다.
그러나 여기서 flexibleSpace와 bottom은 용도가 제한적이고 어렵기 때문에 다음 기회에 2편으로 제작하도록 하겠다.
1. 종합적인 부분(backgroundColor, elevation)
|
1
2
3
4
5
6
7
8
9
10
|
class MyPage extends StatelessWidget {
Widget build(BuildContext context) {
return Scaffold(
appBar:AppBar(
backgroundColor: Colors.red,
elevation: 0,
),
);
}
}
|
cs |
backgroundColor는 배경색을 바꿀때, elevation은 appBar자체의 그림자의 정도이다.
elevation이 높을수록 그림자가 많아진다.

2.title 관련(title, centerTitle)
|
1
2
3
4
5
6
7
8
9
10
11
12
13
|
class MyPage extends StatelessWidget {
Widget build(BuildContext context) {
return Scaffold(
appBar:AppBar(
backgroundColor: Colors.red,
foregroundColor: Colors.blue,
elevation: 0,
title: Text('hello world'),
centerTitle: true,
),
);
}
}
|
cs |
title은 말그대로 글로, Text위젯을 받는다. 글자색이나 폰트등은 Text객체 내에서 수정할 수 있다.
centerTitle은 title을 가운데에 두기 위해서 쓰인다.

3. Icon적인 부분 (leading, actions)
|
1
2
3
4
5
6
7
8
9
10
11
12
13
14
15
16
17
18
|
class MyPage extends StatelessWidget {
Widget build(BuildContext context) {
return Scaffold(
appBar:AppBar(
backgroundColor: Colors.red,
foregroundColor: Colors.blue,
elevation: 0,
title: Text('hello world'),
centerTitle: true,
leading: IconButton(icon: Icon(Icons.menu), onPressed: null),
actions: [
IconButton(icon: Icon(Icons.image), onPressed: null),
IconButton(icon: Icon(Icons.search), onPressed: null),
],
),
);
}
}
|
cs |
leading에는 왼쪽에 icon으로 주로 menu icon을 배치하고, 오른쪽에는 image icon과 search icon을 배치해 두었다.
onPressed 내부에 있는 함수를 수정해서 다양한 기능을 실행시킬 수 있다.
직접적으로 하는방법은 추후에 포스팅 예정.

사용할 수 있는 icon의 종류는 매우 많은데 다음 링크를 통해 사용할 수 있는 icon의 종류를 알아볼 수 있다.
Google Fonts
Making the web more beautiful, fast, and open through great typography
fonts.google.com
이상으로 Flutter appBar 사용법에 대해서 마치겠다. 다른 기능도 존재하지만, 이정도만 알아둬도 appBar를 사용하는데는 문제가 없을 것이다. 여러분의 코딩에 도움이 되었길 바란다.
'Flutter' 카테고리의 다른 글
| 유용한 key 정리 (android studio, flutter) (6) | 2021.08.18 |
|---|---|
| Flutter Sizedbox 로 여백 넣기 (0) | 2021.08.18 |
| image 삽입(flutter) (0) | 2021.08.17 |
| Text widget 사용법(flutter) (0) | 2021.08.16 |
| flutter 기본 코드 (0) | 2021.08.14 |